1
Main Dishes / Traditional Cottage Pie (with photo)
« on: November 18, 2012, 02:19:39 pm »
Traditional Cottage Pie
Serves 4 (or 3 with hearty appetites )
)
Ingredients:
½ tbsp Olive Oil
1 clove garlic
1 medium onion
1 medium carrot
1 large stick celery
300g lean (10% fat) beef mince
Few sprigs thyme
Approx 1 tbps mixed herbs or Herbs de Provence
200g chopped tinned tomatoes
150ml beef stock
100ml red wine (optional - if not using just add an additional 100ml water)
Good dash Worcestershire Sauce
1 tsp Umami paste
1 tbsp tomato puree
1 tbsp tomato ketchup
1 tbsp flour
Salt & Pepper
250g potato
250g sweet potato
10g butter
1 tsp Dijon mustard
50g milk
50g cheddar cheese
Preparation:
This recipe is part converted, and part Thermomix - either way, it all seemed to work quite nicely!
1. Grate cheddar, Speed 6 for about 10 secs or until desired consistency. Set aside.
2. Add onion, carrot, celery, garlic & herbs to Thermie. Chop for 5 secs, Speed 4. Scrape down sides.
3. Add Olive Oil, Cook for 5 mins, Varoma, Reverse Speed 1.
4. Add mince, Cook 4 mins, Varoma, Reverse Speed 1.
5. Add chopped tomatoes, stock, wine, Worcestershire sauce, tomato puree, ketchup, flour, umami paste and Salt/Pepper to season.
6. Cook 20 mins, 100 degrees, reverse speed 1, with measuring cup on an angle to let the steam escape. Check consistency once done. If gravy is still too runny, cook 3.5 mins, Varoma, Reverse speed, NO measuring cup but upturned basket on top to catch the splashes, just to reduce the gravy a little bit
7. Spoon mince mix into cooking dish and set aside. Wash Thermie.
8. Add 350ml water and some salt to Thermie. Cut up Potato and Sweet Potato into 2cm chunks. Insert basket to Thermie, add the Potatoes. Cook Varoma, Speed 3 for 18 mins.
9. Drain potatoes and discard cooking water. Fit butterfly, then add potatoes back into empty Thermie.
10. Add milk, butter & Dijon mustard. Blitz on Speed 4 for about 6 seconds, check consistency. If still a bit lumpy, remove butterfly and blitz on Speed 6 for about 4 secs until smooth.
11. Top mince mixture with Mash, spread over. Top with Cheese.
12. Cook approx 25 mins at 180 degrees until browned. Let stand for 5 minutes before serving.
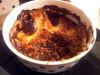
My bf pronounced it very tasty Here's a pic after he'd started to demolish it!
Serves 4 (or 3 with hearty appetites
) Ingredients:
½ tbsp Olive Oil
1 clove garlic
1 medium onion
1 medium carrot
1 large stick celery
300g lean (10% fat) beef mince
Few sprigs thyme
Approx 1 tbps mixed herbs or Herbs de Provence
200g chopped tinned tomatoes
150ml beef stock
100ml red wine (optional - if not using just add an additional 100ml water)
Good dash Worcestershire Sauce
1 tsp Umami paste
1 tbsp tomato puree
1 tbsp tomato ketchup
1 tbsp flour
Salt & Pepper
250g potato
250g sweet potato
10g butter
1 tsp Dijon mustard
50g milk
50g cheddar cheese
Preparation:
This recipe is part converted, and part Thermomix - either way, it all seemed to work quite nicely!
1. Grate cheddar, Speed 6 for about 10 secs or until desired consistency. Set aside.
2. Add onion, carrot, celery, garlic & herbs to Thermie. Chop for 5 secs, Speed 4. Scrape down sides.
3. Add Olive Oil, Cook for 5 mins, Varoma, Reverse Speed 1.
4. Add mince, Cook 4 mins, Varoma, Reverse Speed 1.
5. Add chopped tomatoes, stock, wine, Worcestershire sauce, tomato puree, ketchup, flour, umami paste and Salt/Pepper to season.
6. Cook 20 mins, 100 degrees, reverse speed 1, with measuring cup on an angle to let the steam escape. Check consistency once done. If gravy is still too runny, cook 3.5 mins, Varoma, Reverse speed, NO measuring cup but upturned basket on top to catch the splashes, just to reduce the gravy a little bit
7. Spoon mince mix into cooking dish and set aside. Wash Thermie.
8. Add 350ml water and some salt to Thermie. Cut up Potato and Sweet Potato into 2cm chunks. Insert basket to Thermie, add the Potatoes. Cook Varoma, Speed 3 for 18 mins.
9. Drain potatoes and discard cooking water. Fit butterfly, then add potatoes back into empty Thermie.
10. Add milk, butter & Dijon mustard. Blitz on Speed 4 for about 6 seconds, check consistency. If still a bit lumpy, remove butterfly and blitz on Speed 6 for about 4 secs until smooth.
11. Top mince mixture with Mash, spread over. Top with Cheese.
12. Cook approx 25 mins at 180 degrees until browned. Let stand for 5 minutes before serving.
My bf pronounced it very tasty
Here's a pic after he'd started to demolish it!

